

If I live near the coast, I clean shutters with mild soap, low-pressure water, and soft brushes – then I rinse often to keep salt from eating away at the finish and hardware.
Salt air can start causing wear fast, especially on ocean-facing sides of a home. For most shutters, I’d stick with about 1 tablespoon of mild dish soap per 1 gallon of warm water, use a hose on a gentle spray, and skip harsh cleaners, wire brushes, and pressure washers. If a house sits within 1/2 to 1 mile of the ocean, a weekly rinse is often the safest routine, while many sheltered spots can get by with a monthly rinse and 2–4 deep cleanings per year.
Here’s the short version:
- Pre-rinse first to loosen salt and grit
- Wash in small sections so soap doesn’t dry on the surface
- Scrub salt-heavy spots like louvers, bottom rails, hinges, and fasteners
- Rinse well and dry to cut down on residue and water spots
- Inspect hardware and finish for rust, chalking, cracks, peeling, or binding
- Rinse after storms and strong onshore winds
- Use silicone lubricant on dry hardware if needed
A few material notes matter too. Painted wood can blister or peel. Aluminum can get white oxidation and pitting. Steel hardware can show red rust. And vinegar should only be used with care – not on bare wood or aluminum unless the maker says it’s safe.
Bottom line: I’d clean gently, inspect while I work, and not let salt sit for long. That simple routine does more than an occasional heavy wash, especially since shutters outlast drapes in these environments due to their durability.
How to Clean and Maintain Exterior Shutters
sbb-itb-bbd3158
Cleaning Supplies to Gather Before You Start
Before you wash your shutters, set out a mild cleaner and a few soft tools. That simple prep step helps you clear away salt without leaving scratches behind.
Safe Soap Mixes for Vinyl, Composite, Wood, and Aluminum
For most exterior shutters, use about 1 tablespoon of mild dish soap per gallon of warm water at around 100–110°F. [14]
If you’re cleaning sealed or painted wood, you can spot-treat stubborn salt or mineral marks with 1 cup of white vinegar per gallon of water, then rinse the area well. Don’t use vinegar on bare wood or aluminum unless the manufacturer says it’s okay. [9][11]
It also helps to pick a nonabrasive, pH-neutral cleaner that’s labeled safe for painted surfaces.
Soft Tools for Cleaning Louvers, Frames, and Hardware
The tools matter more than people think. Salt loves to settle into louver edges, corners, and around hardware, so softer tools make the job easier without messing up the finish.
Have these on hand:
- Microfiber cloths for wiping louver faces, frames, and drying surfaces after rinsing
- A nonabrasive sponge for flat frame sections and larger louver faces
- A soft-bristle nylon brush for loosening salt and grime from louver edges
- An old toothbrush for corners, screw heads, hinge leaves, and tight spaces around fasteners
- A garden hose with an adjustable nozzle set to a wide fan or gentle shower spray for the pre-rinse and final rinse
- A stable step ladder for reaching first- or second-story shutters safely
What Not to Use on Coastal Shutters
A few tools and cleaners are best left out entirely. Wire brushes, abrasive pads, scouring powders, and pressure washers can scratch the surface and push water into joints and screw holes. [7][12][13]
You should also avoid bleach, ammonia cleaners, strong acids, acetone, and mineral spirits unless the manufacturer approves them. Bleach, for example, can yellow vinyl and corrode hardware. [5][6][8][10][14]
Proper maintenance is key to how long shutters last in coastal environments. With your supplies ready, you can move on to the pre-rinse and wash.
How to Clean Exterior Shutters Step by Step
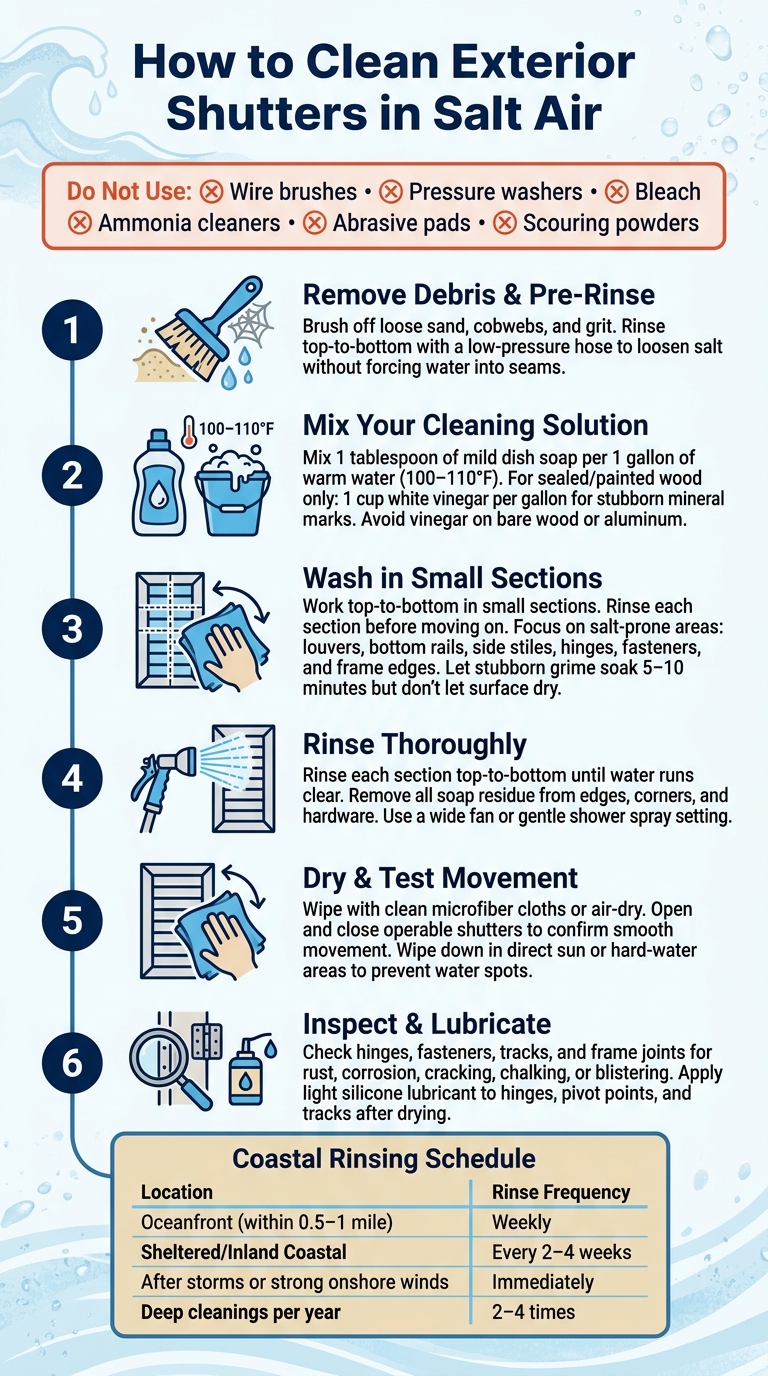
How to Clean Coastal Shutters: Step-by-Step Guide for Salt Air Homes
Clean from top to bottom. That way, dirty runoff won’t land on parts you’ve already washed, and soap is less likely to dry on the surface.
Remove Dry Debris and Pre-Rinse With Fresh Water
Start at the top of the shutter and work your way down. Use a soft-bristle brush or a dry microfiber cloth to clear away loose sand, cobwebs, and grit before you add water. It’s a small step, but it helps stop debris from scraping across the shutter as you clean.
Once you’ve cleared the loose mess, rinse the shutter with fresh water on a low-pressure hose setting. A gentle spray helps loosen salt buildup without pushing water into seams, hinge gaps, or screw holes.[16][17][1]
Wash in Small Sections and Scrub Salt-Prone Areas
Wash one small section at a time, then rinse it before moving on. If cleaner sits too long, it can dry on the surface and leave behind haze or spotting.
Pay close attention to the spots where salt tends to build up first:
- Louvers
- Bottom rails
- Side stiles
- Hinges
- Fasteners
- Frame edges
These are also the areas where salt damage often begins. Use a soft-bristle brush along louver edges and a small soft brush around hardware. If you run into stubborn grime, let it sit for 5 to 10 minutes. Just don’t let the surface dry before you rinse.[3]
Rinse, Dry, and Check Shutter Movement
Rinse each section from top to bottom until the water runs clear and no soap is left on edges, corners, or hardware. Any residue left behind can pull in more grime before the next cleaning.
After rinsing, wipe the shutters with clean microfiber cloths or let them air-dry. If the shutters are in direct sun or you’re dealing with hard water, wiping them down can help cut down on water spots. For operable shutters, open and close the panels once they’re dry to make sure they move smoothly.[15][4] After that, check hinges, fasteners, tracks, and frame joints for any damage as part of your shutter maintenance routine.
What to Inspect While You Clean
Cleaning is the best time to inspect your shutters. Salt and moisture tend to highlight early wear, and once that salty film starts coming off, problem spots are much easier to see.
Check Hinges, Fasteners, Tracks, and Frame Joints
Don’t stop at the shutter panel. Look closely at the spots where the shutter connects to the wall or frame. Corrosion at the anchor point can cause the shutter to fail even if the panel itself still looks okay.[19][20]
Pay extra attention to places that hold water, like hinge leaves, track bottoms, and other low spots. Run your hand over hinges, screw heads, guide rails, and frame joints. You’re checking for grit, stiffness, or anything loose.
If the shutters open and close, test them slowly. Binding, scraping, or uneven movement usually points to track wear or corrosion.[18][19]
Once the hardware looks okay, check the finish for surface damage.
Look for Chipping, Cracks, Chalking, and Blistering
On painted wood, look for chipping, peeling, or blistering, especially along the bottom rail. That area often takes the most abuse.
On vinyl or composite shutters, watch for chalking, fading, or cracks. Minor damage doesn’t always mean you need a repair right away. In many cases, regular cleaning and rinsing help keep it in check. But if the same issue keeps coming back, it’s no longer just a cleaning problem. It’s wear, and you may need to consider shutter installation in Horry County for replacements.
When Maintenance Becomes a Repair Issue
Some signs mean routine upkeep may not be enough anymore. Spreading corrosion, warped panels, or shutters that keep binding even after cleaning and lubrication are all warning signs.
Heavy spray calls for monthly checks.[19] And if corrosion keeps returning or the shutters still bind after cleaning, treat it as a repair issue.
What you spot now can help you next time. If one area keeps taking the brunt of the salt, give that spot extra rinsing during your next cleaning.
How to Reduce Future Salt Buildup and Surface Wear
After cleaning, the main goal is simple: don’t let salt sit on the shutters long enough to build up again. A basic rinse-and-dry routine goes a long way.
Set a Simple Coastal Rinsing Schedule
Once the shutters are clean, regular fresh-water rinsing is part of a coastal shutter maintenance checklist that helps slow the next round of salt buildup. Rinse shutters with fresh water every 1 to 4 weeks, and do it more often if the home gets heavier exposure. Oceanfront homes should get a weekly rinse. Homes farther inland can usually rinse every 2 to 4 weeks, or once a month, based on distance from the coast and how open the lot is to the prevailing sea breeze.[24][26][2]
It also makes sense to rinse after tropical storms, strong onshore winds, or anytime you spot a white, gritty residue on the surface.[26][27][25]
Keep Water From Sitting on Shutters and Hardware
Salt isn’t the only problem. Standing water can wear down finishes and hardware over time. After rinsing or after heavy rain, check tracks, sills, hinge pockets, and drainage holes for sand, leaves, and grit. When debris builds up, it holds moisture against fasteners and along the lower edges of the shutters. That’s often where corrosion starts first.[22][23]
Wipe away trapped water from corners, hinge pockets, and frame joints. After the shutters are fully dry, add a light silicone lubricant to hinges, pivot points, and tracks. That helps cut friction and gives hardware added protection from rust.[15][21]
Conclusion: Clean Gently, Inspect Often, and Stay Ahead of Salt
Clean gently, rinse on a steady schedule, and keep hardware dry. That’s the basic routine that helps coastal shutters stay in good shape between seasons. For more inspiration, explore these coastal window treatment ideas for your home.
FAQs
How do I know if salt is damaging my shutters?
Inspect your shutters once a month. Look closely at hinges, brackets, tilt rods, and screws for signs of salt damage, like rust, greenish patina, or white, chalky buildup.
Then check how the shutters move. If they stick, grind, or feel stiff, that can point to wear from salt and moisture. You should also watch for chipped paint, blistering, dull patches, or warped louvers.
With wood shutters, pay extra attention to the surface. Soft or spongy spots can mean moisture has slipped through the finish and started to cause damage.
Can I clean coastal shutters without removing them?
Yes. You can usually handle routine cleaning with the shutters still in place. A damp microfiber cloth works well, and for a bit more grime, use a mild soap-and-water mix.
For exterior shutters, a low-pressure garden hose can help wash away salt deposits. It’s a simple step, but it goes a long way.
Take the shutters down only for deeper monthly cleaning, especially if you need to reach the areas behind the unit where salt tends to collect. While you’re at it, check the hardware and other hard-to-reach spots on a regular basis.
When should I repair shutters instead of just cleaning them?
Seek professional repair or a full assessment if cleaning doesn’t fix problems like grinding, squeaking, rattling, jamming, or slow movement.
You should also call in an expert if you spot visible damage, including warping, bending, cracks, or soft spots. The same goes for rust that keeps coming back, worn seals, or switches and motors that aren’t working the way they should.
